
Administrative Commands
BWI gives you the ability to have unlimited clients and the clients can have unlimited ads. To add a client, log into the Admin Module, and click on the Add Client command. You will then be prompted for information about your client. At the bottom, there is a place for notes about your client. This is the place to enter extra information such as billing, certain arrangements with the client, etc. Not all of the fields are required. If you want the client to be able to log into the Client's Module and view their stats, then you must supply the Client Login, Login Password, and select the Login Enabled button.
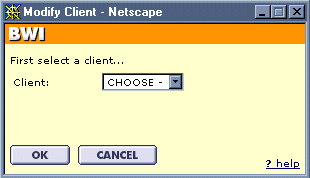
To modify a client, log into the Admin Module and click on the Modify Client command. Next, a small window will come up with the list of clients. Select the client that you wish to modify. If you do not want to modify a client, then click the Cancel button. Once you have chosen the client that you want to modify, hit the OK button, and the modify client form will be loaded in the main window. NOTE: The Login Password field says "Modify to Change". Only enter a password there if you want to change the client's password. Otherwise, the old password will remain.
To delete a client, log into the Admin Module and click on the Delete Client command. Next, a small window (very similar to the Modify Client window) will appear. Select the client you wish to delete, and click the OK button. If at any time you wish to cancel the deletion of the client, just click the Cancel button.
To view the stats of a client (which contains all the stats of all ads belonging to the client), log into the Admin Module and click on the View Stats command. Next, a small window (very similar to the Modify Client window) will appear. Select the client you wish to view, and click the OK button. Next, a page with all the stats will come up. To understand how to summarize these stats (view the daily stats), then go to Viewing daily stats (Summarizing Stats).

To add a banner to the rotation, first log into the Admin Module and click on the Add Banner command. Next, the Add Banner form will come up. The definitions of the fields on the Add Banner form are as follows:
Client: Client that owns this ad
Display Mode: Method to display (banner ad, HTML ad, or both)
Banner Nick Name: Unique name given to this ad
Banner File: Banner ad file (ignore if this is HTML ad)
Banner width, height, border: Banner parameters
Banner Linked Text: Linked text under banner ad
Banner ALT Text: The alt text of the banner ad
Banner Link: URL to go to when the banner is clicked
Image Other Tag(s): Other tags in <IMG> tag (possibly JavaScript)
Link Other Tag(s): Other tags in <A> tag (possibly JavaScript)
HTML Ad: HTML to be printed out for HTML ad
Maximum Exposures/Clicks: Max exposures/clicks allowed, depending on what kind of account it is
Ratio: Ratio to all the other ads in the DB
Bonus Exposures: Used to give ad "extra credit"
Termination Method: Method to expire ad
Start Date: Date to start ad
End Date: Date to end adNOTE: If you're not sure which banner file to use, you can click the View Banner button to view each banner on the list. If the banner has not been uploaded yet, you can click the Upload Banners button, and it will take you to the Upload Banners form. With an HTML ad, only exposures can be counted, because there is no guarentee that the HTML ad will have a link (which will be clicked) to redirect the .cgi program. DO NOT set an HTML ad to expire by maximum clicks, because it will never expire. For the termination method, you can set the ad to never expire, to expire by max clicks or exposures (set in the Maxumum Exposures/Clicks field) or to expire by end date. If you have selected by end date, the ad will not start until the start date has been reached, and will expire when the end date is reached. When an ad expires, it does not disappear but remains inactive until you activate it. Bonus Exposures are a way of temporarily activating it. By giving it Bonus Exposures (depending on the termination - exposures or clicks), BWI will allow it to be viewed as long as it has bonus exposures.
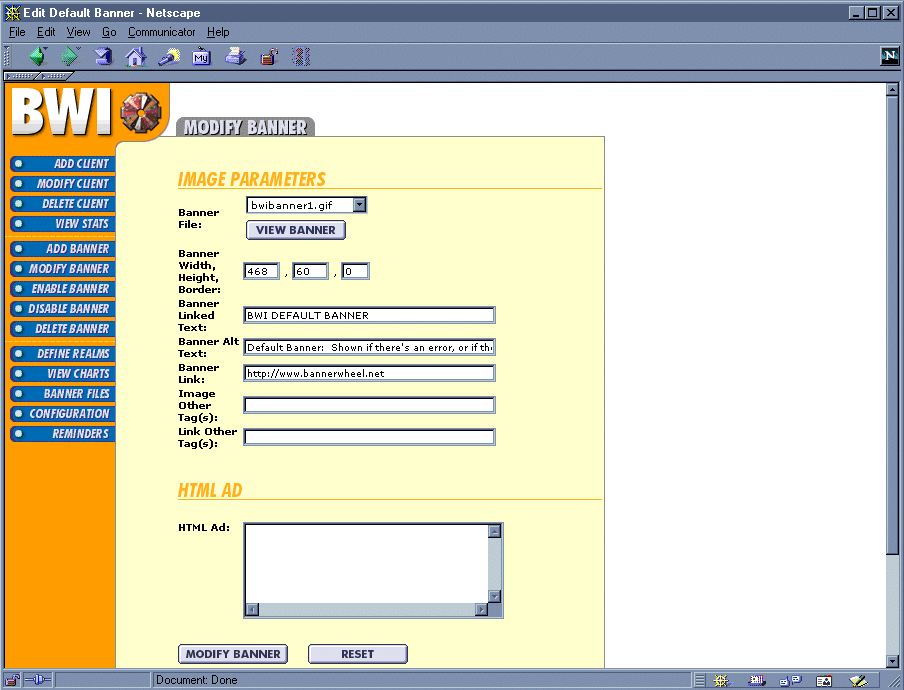
To modify a banner, first log into the Admin Module and click on the Modify Banner command. Next, a small window (very similar to the Modify Client window) will appear and prompt you to select the client that owns the ad you wish to modify. Select the client and click the OK button. Next, in the small window, a list of all the banners belonging to that client will appear. If you have selected the wrong client (the banner you wish to modify isn't in the list) select another client in the client list, and that client's list of ads will appear. Once you have located the ad you wish to modify, click the OK button. The Modify Banner form will appear in the main window. Note also that each ad with "*" next to it is inactive.
To enable a banner, first log into the Admin Module and click on the Enable Banner command. Next, a small window will appear and prompt you to select the client that owns the ad you wish to enable. Select the client and click the OK button. Next, a list of the client's ads (that are inactive) will be displayed. Select the ad you wish to enable, and click the OK button. If the ad you want is not under the client you selected, select another client from the list and that client's list of ads will appear. Note that when you enable an ad, it sets the Termination Method to Unlimited Exposures. To change this, just Modify the ad.
To disable a banner, first log into the Admin Module and click on the Disable Banner command. Next, a small window will appear and prompt you to select the client which owns the ad you wish to disable. Select the client and click the OK button. Next, a list of the client's ads (that are active) will be displayed. Select the ad you wish to disable, and hit the OK button. If the ad you want is not under the client you selected, just select another client from the list, and that client's list of ads will appear. Note that when you disable an ad, the program sets the Termination Method to maximum exposures, and sets the maximum exposures to 0.
To delete a banner, first log into the Admin Module and click on the Delete Banner command. Next, a small window will appear and prompt you to select the client which owns the ad you wish to delete. Select the client and click the OK button. Next, a list of the client's ads will be displayed. Select the ad you wish to delete and click the OK button. If the ad you want is not under the client you selected, just select another client from the list, and that client's list of ads will appear. Note that when you delete an ad, it totally removes all data associated with the ad from the DB. However, the banner file still remains for later use.
The Define Realms option has four commands that can be selected: Add New Realm, Modify Realm, Delete Realm, View Realm's Stats. To use the commands, first log into the Admin Module and click on the Define Realms command. Next, a page will be displayed with the list of four Realm commands. To add a realm, select the Add New Realm command and click the Define Realms button. The Add Realm form will then be displayed. Listed below are the definition for the form fields:
Realm Name: Unique name for this realm
Include Accounts: Account to group under this realmNote that for some browsers, you must hit the CTRL + CLICK to select multiple accounts in the Include Accounts field.
To modify a realm, select the Modify Realm command, then select the Realm you wish to modify and click the Define Realms button. To delete a Realm, select the Delete Realm command, then select the Realm you wish to modify and click the Define Realms button. To view the stats of a realm, select the View Realms Stats command, then select the Realm in which you wish to view and click the Define Realms button.
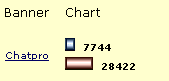
To view graphical statistics of all the ads in the DB, log into the Admin Module and click on the View Charts command. Next, the View Charts page will be displayed. Use the key to determine which color represents exposures and which color represents clicks. To view more detail information about an ad, click on the name of the ad.
The Banner Files command has many commands associated with it. To execute this command, first log into the Admin Module and click on the Banner Files command. Next a page will be dispalyed with the Current Filenames (list of all banners in the upload directory), Command (rename a banner file, delete a banner file, duplicate or copy a banner file, and view a banner file), in addition to the New Filename field (used for rename and duplicate). To rename a banner file, select the Rename command, select the banner file you wish to rename from the Current Filenames list, type the new filename in the New Filename field, and click on the DO IT! button. To delete a banner file, select the Delete command, select the banner file you wish to delete from the Current Filenames list, and click on the DO IT! button. To duplicate a banner file, select the Duplicate command, select the banner file you wish to duplicate from the Current Filenames list, type the new filename in the New Filename field, and click on the DO IT! button. To view a banner, select the View command, then select the banner file you wish to view from the Current Filenames list, and click the DO IT! button. The page will then reload, displaying the banner you wished to view at the top of the page.
The Reminders command allows you to send an email to the client when their account has gone inactive. Before this can work, you must set a crontab. For more information on this, please contact support@command-o.com. To setup the Reminders, first log into the Admin Module and click on the Reminders command. Next, the Reminder Configuration page will come up. Listed below are the definitions of each field:
Sendmail Program: Full system path to your sendmail program
Reminder Method: Remind the client (two methods, one for ads that expire from a date, and another for ads that expire from max exposures/clicks)
Administrator's E-Mail: Email address in the From: field
Subject of Message: Text in the Subject: field of email
Exposures/Clicks Message: Message sent to ads that have expired and are set to expire by max exposures/clicks
Date Message: Message sent to ads that have expired and are set to expire by datePlease note that this is a generic message sent to all clients that have expired, so we recommend that you not make the message content specific to one client.
© 1996 - 2000, Command-O Software, Inc.